Once you see the basic principles, you can customize them to your needs. This tutorial will take you step-by-step through three ways to create a Photoshop glow effect: Follow along and let your creativity lead the way!
1. How to Add a Photoshop Glow Effect Using a Gaussian Blur for Portraits
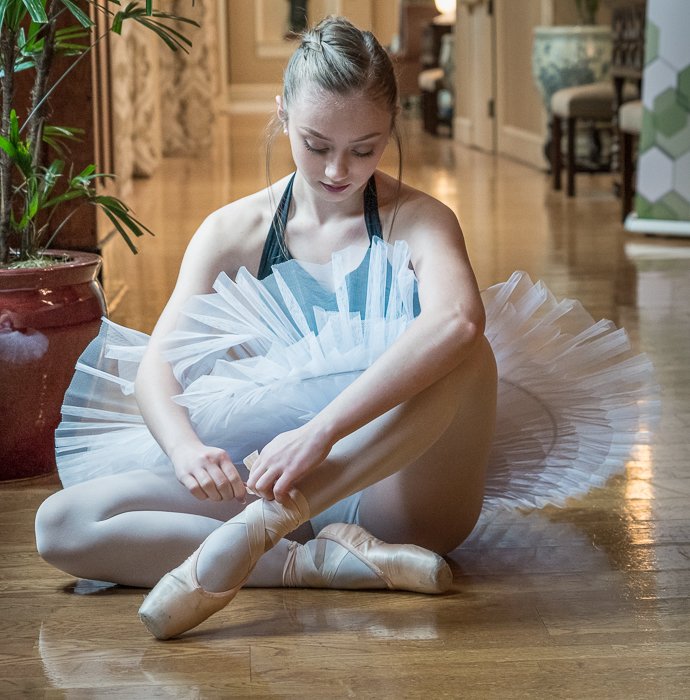
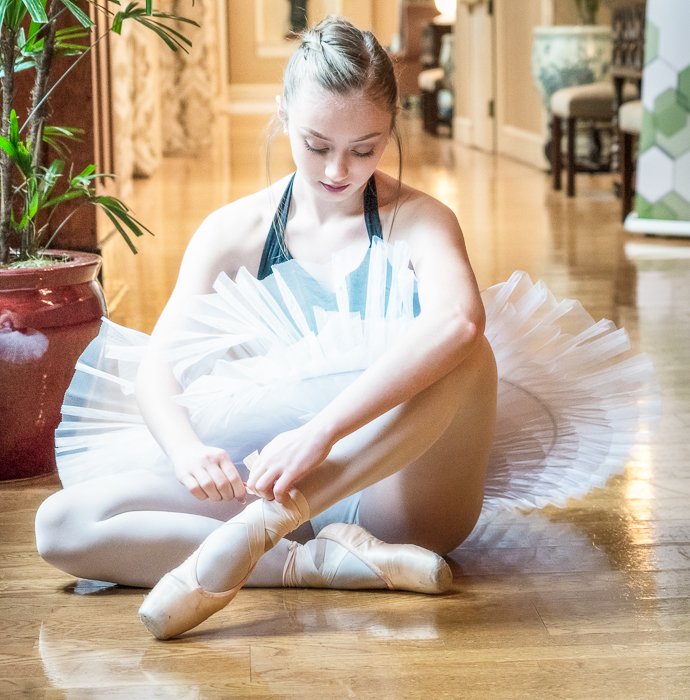
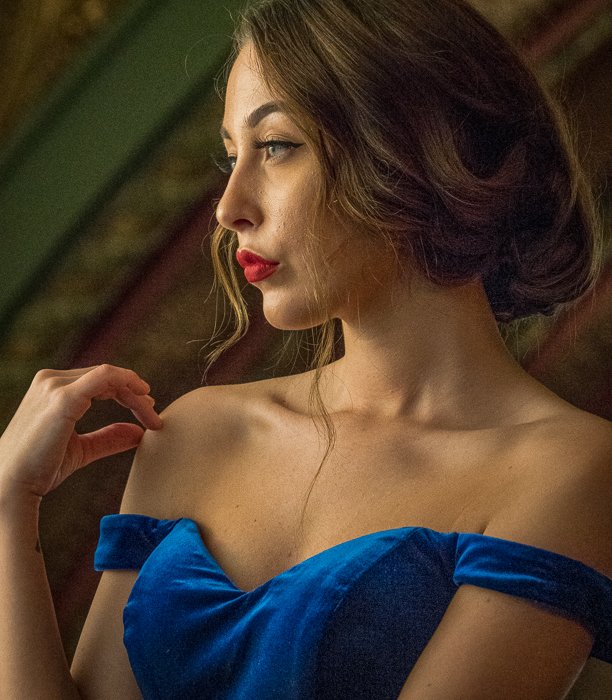
Adding a Gaussian blur to a portrait is the easiest and most popular way to add a subtle glow effect in Photoshop. You can add a little or a lot. It’s up to you. Let’s add a soft glow to this portrait of a ballet dancer.
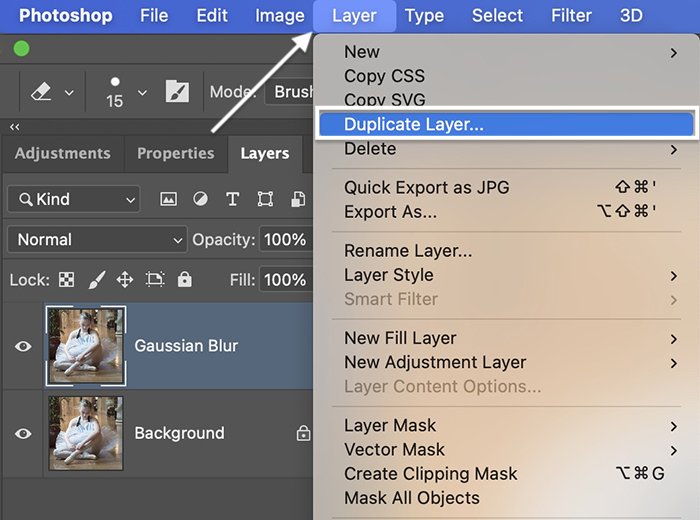
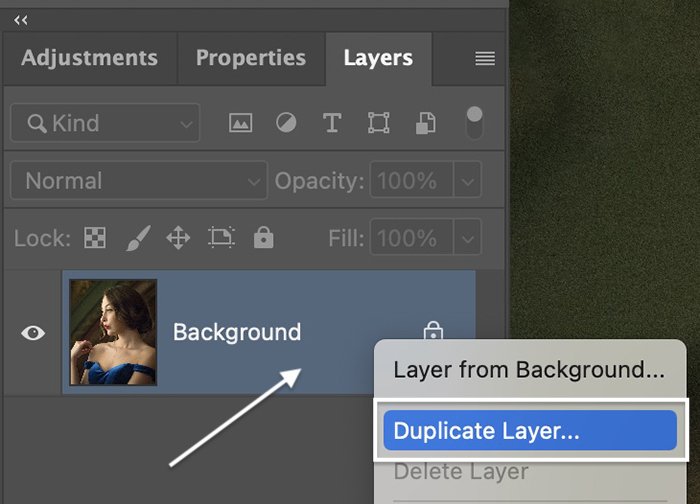
Step 1: Create a Duplicate Copy
Open your image in Photoshop. Select the image (‘Background’ layer). Make a copy by going to the Layer drop-down menu and selecting Layer > Duplicate Layer (Ctrl or Command+J). Double click on the title and rename the layer ‘Gaussian Blur’.
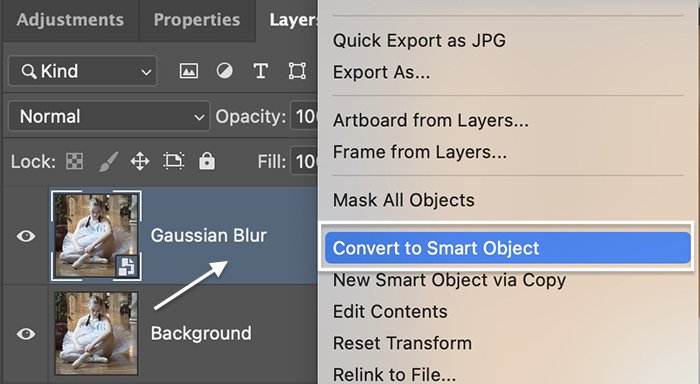
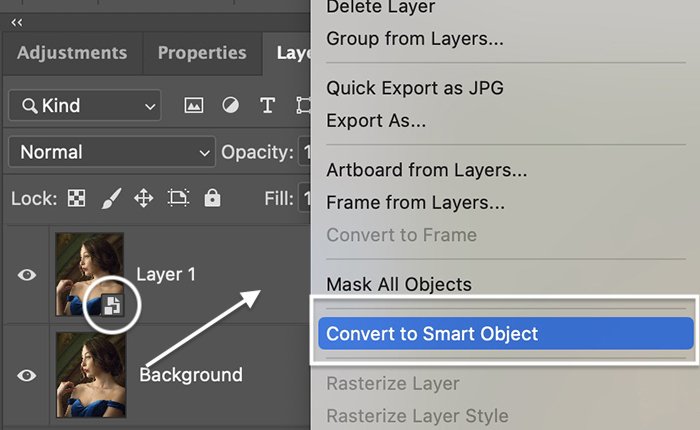
Step 2: Convert Blur Layer to Smart Object
Right-click on the ‘Gaussian Blur’ layer and select Convert to Smart Object. A symbol appears in the lower right-hand corner of the thumbnail. If this is a Smart Object, you can re-adjust the amount of blur at any time.
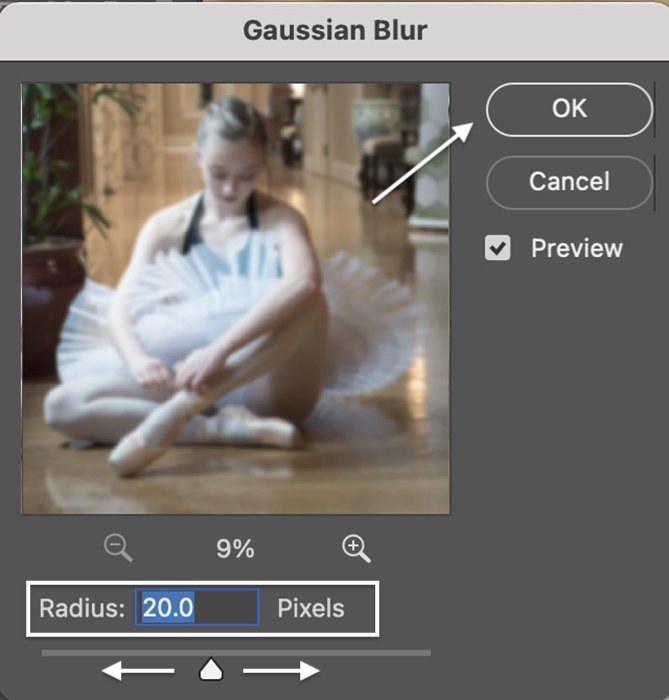
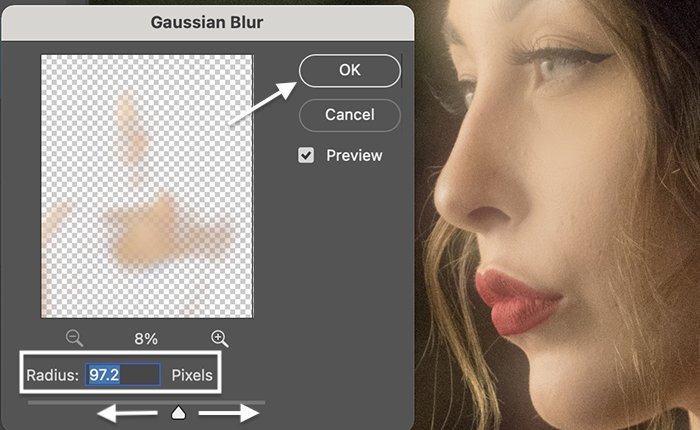
Step 3: Add a Gaussian Blur
Go to the Filter drop-down menu and select Filter > Blur > Gaussian Blur. There are other blur options available. Gaussian is the most popular choice because it creates a smooth blur. But feel free to explore the others. In the Gaussian Blur window, enter a number into the Radius box or move the slider to the right to add blur. You can choose from a range between 0.1 to 1000 pixels. Usually, somewhere between 10 and 20 pixels is enough. We will integrate it in the next step, so do not worry if the blur seems too heavy at this stage. Click OK.
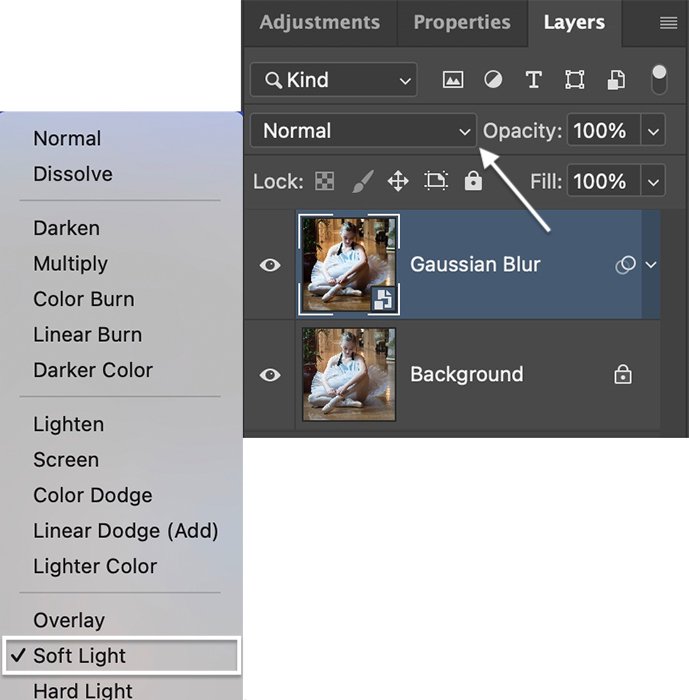
Step 4: Change the Blend Mode
With the blur layer selected, open the Blending Mode drop-down menu at the top of the Layers panel. By default, it is set to Normal. You have a couple of options. Soft Light, Overlay, and Screen all work well for adding glow effects to a portrait. Overlay adds more contrast and Screen will lighten the exposure. Both Overlay and Soft Light add a little saturation to the image.
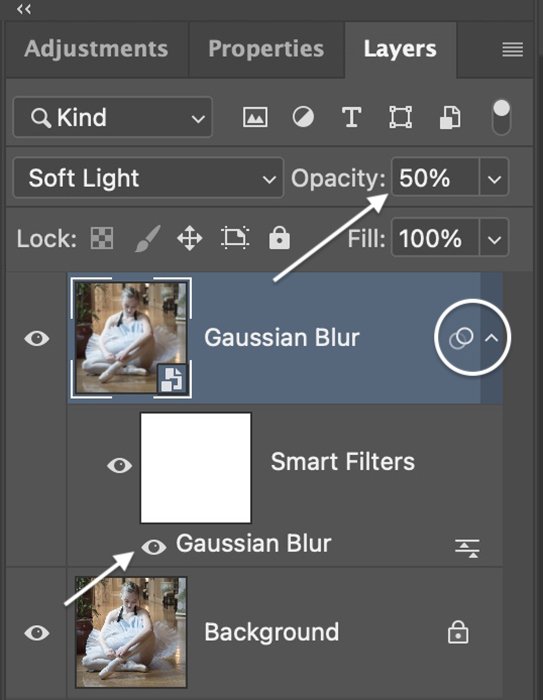
Step 5: Reduce the Opacity
If the glow effect is too strong, reduce the opacity of the blur layer. This will let the original image show through and reduce the effect. You can further fine-tune the glow by opening the caret symbol next to the layer name. Double-click on the Gaussian Blur option to open the window and re-adjust the blur. Or remove blur from select areas using a layer mask.
2. How to Add a Highlight Glow Effect for Portraits
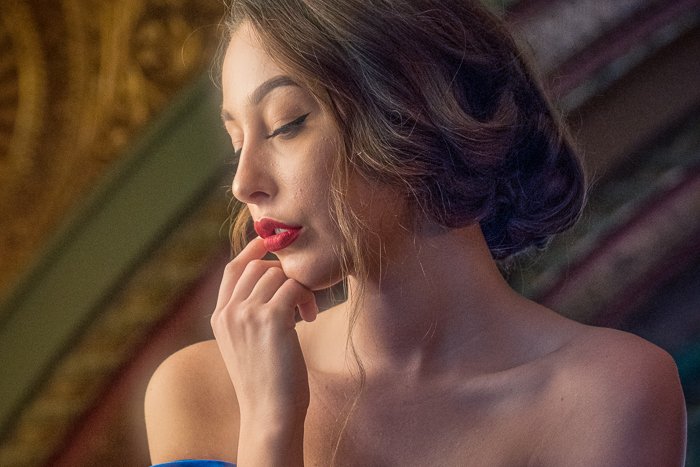
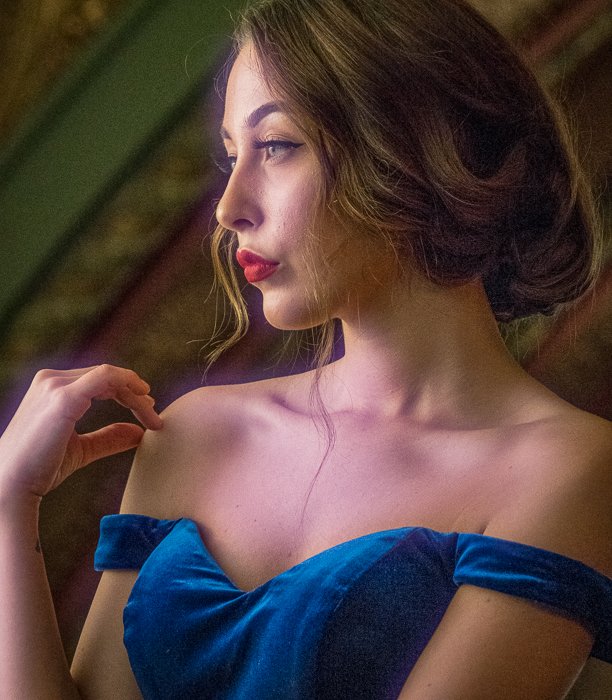
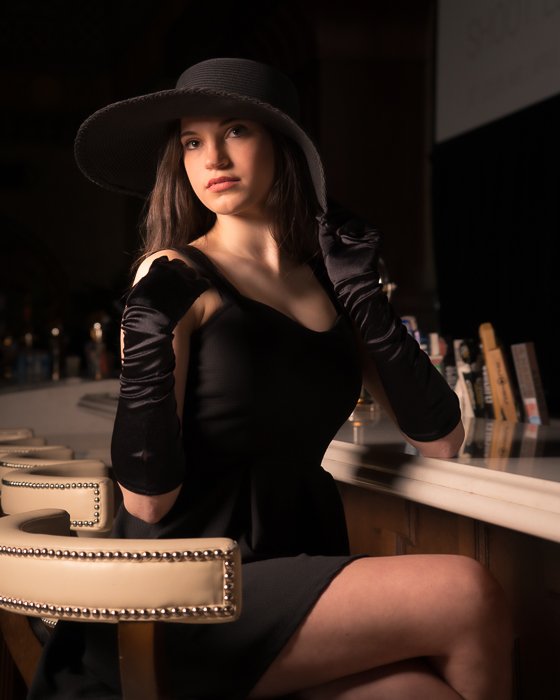
Adding a blur to the entire image is a quick way of creating glow effects in a portrait. You can get a more sophisticated glow if you add it only to the highlights… In reality, shadows do not glow. Photoshop makes it easy to target highlights and create the look of a glowing light source. Let’s add glowing light to the highlights in this portrait of a glamourous model. For a final touch, we will add a subtle color to the glow.
Step 1: Create a Duplicate Layer
Open your image in Photoshop and right-click on the ‘Background’ layer. Select Duplicate Layer (Ctrl or Command+J).
Step 2: Convert Layer to a Smart Object
Right-click on the duplicate layer and select Convert to Smart Object. A symbol appears in the lower right-hand corner of the thumbnail to designate it as a Smart Object.
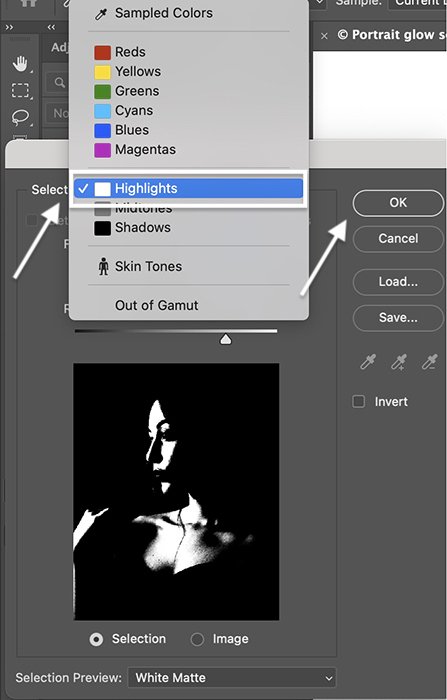
Step 3: Select Highlights
To select the highlights, go to the Select drop-down menu. Choose Select > Color Range. This tool lets you select a range of colors in your image. But it also can select shadows, midtones, and highlights. In the Color Range window, open the Select drop-down menu and choose Highlights. Use the Range slider to increase or decrease the highlight range. You will see the selected (white) highlights in the preview window. Click OK. The highlights will be surrounded by marching ants. Photoshop will preserve the strength of the highlights. So, transitions between highlights and midtones are kept.
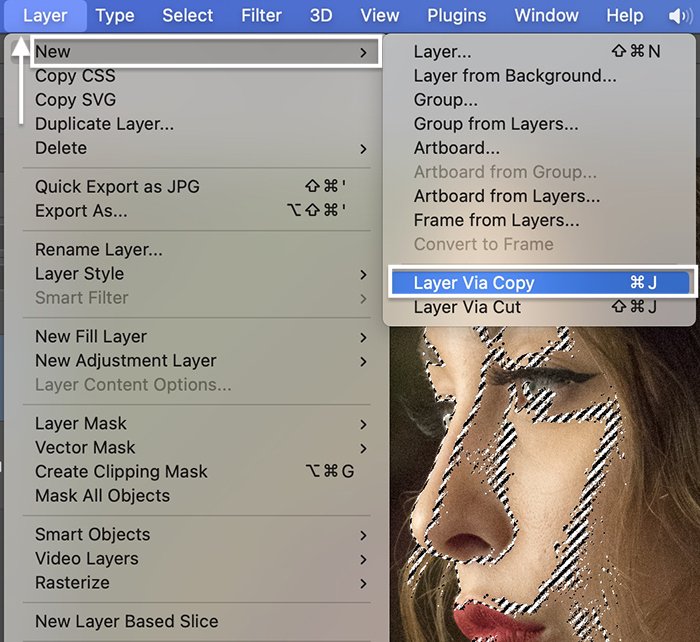
Step 4: Copy Highlights to New Layer
Go to the Layer drop-down menu. Choose Layer > New > Layer Via Copy (Ctrl or Command+J). This will create a new layer containing the highlights.
Step 5: Add Gaussian Blur to Highlights
Select the new layer containing the highlights. Go to the Filter drop-down menu. Select Filter > Blur > Gaussian Blur. Enter a pixel value or use the slider to add blur. Select a blur of around 100. Do not worry if the blur seems strong. We will integrate it into the image in the next step. Click OK.
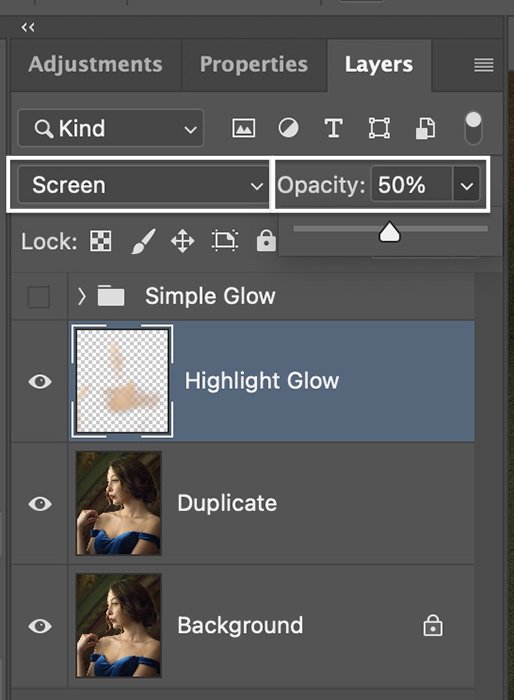
Step 6: Change Blend Mode and Layer Opacity
On the layer containing the highlights, change the blending mode at the top of the Layers panel to Screen and lower the opacity to around 50%. Soft Light and Overlay blend modes also work well. Experiment with the opacity until you get a subtle glow.
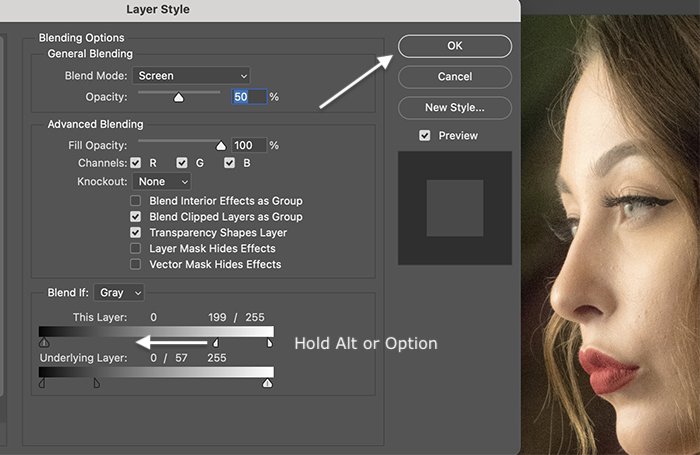
Step 7: Blend with Layer Style (Optional)
Double-clicking on the layer containing the highlights opens the Layer Style window. To fine-tune the glow effect, use the ‘Blend If’ sliders. We will be working with the ‘This Layer’ slider. There is a tab on the left underneath the gradient that controls shadows and a tab on the right that controls highlights. In this case, there are no shadows, only highlights. Moving the right-hand tab towards the center removes the glow effect from the brightest highlights. We actually want the reverse to happen. We want to limit glow to the brightest highlights. Hold the Alt or Option key while sliding the tab to the left. The tab splits into two parts. This will bring back some of the darker detail lost in the glow. Click OK.
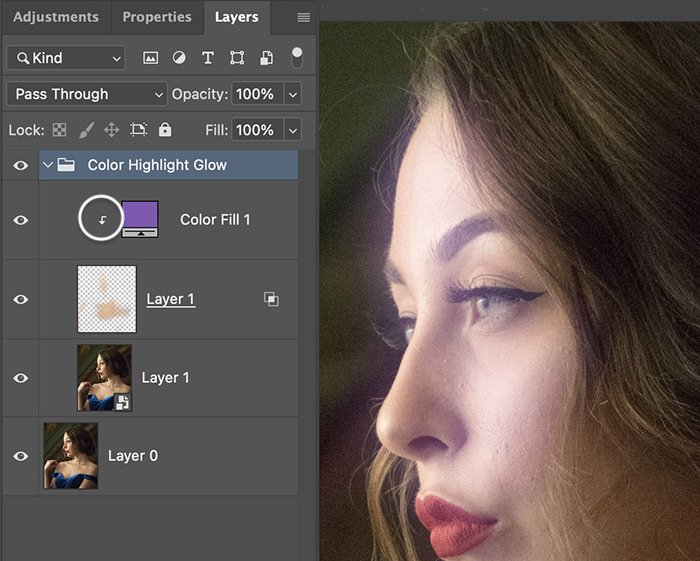
Step 8: Add Color to the Glow (Optional)
To add a subtle color to the glow, select the highlights. Go to the Layer drop-down menu. Choose Layer > New Fill Layer > Solid Color. You can also experiment with adding a gradient. Name the layer and click OK. The Color Picker window opens. Try different colors until you find one that you like. By default, Color Fill only applies to the highlight layer. This is shown by a down arrow to the left of the label. If you do not see the arrow, go to the Layer drop-down menu and select Layer > Create Clipping Mask (Alt+Ctrl+G or Option+Command+G).
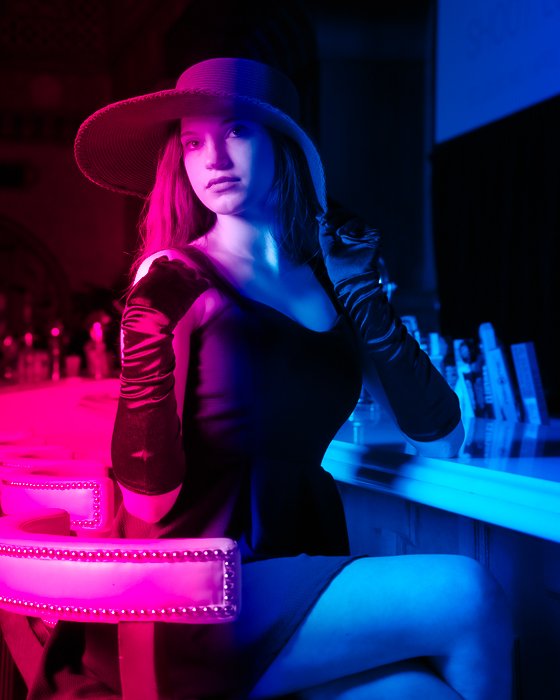
3. How to Add a Neon Glow Effect for Portraits
Using bright colors and blend modes, Photoshop lets you easily create a neon glow effect. This adds an edgy element to a dark portrait. You can create this effect using the techniques you have already learned about creating a glow. For this effect, we will add color first. Then we will add the blur.
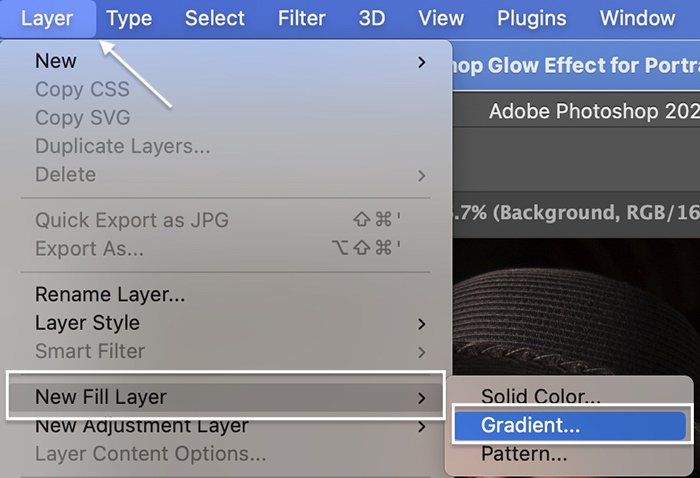
Step 1: Add Gradient Fill
Open your image in Photoshop. To add the neon colors, go to the Layer drop-down menu. Choose Layer > New Fill Layer > Gradient. You can add a glow with one color. But with the gradients, you can add two or more different colors. Name the layer and click OK.
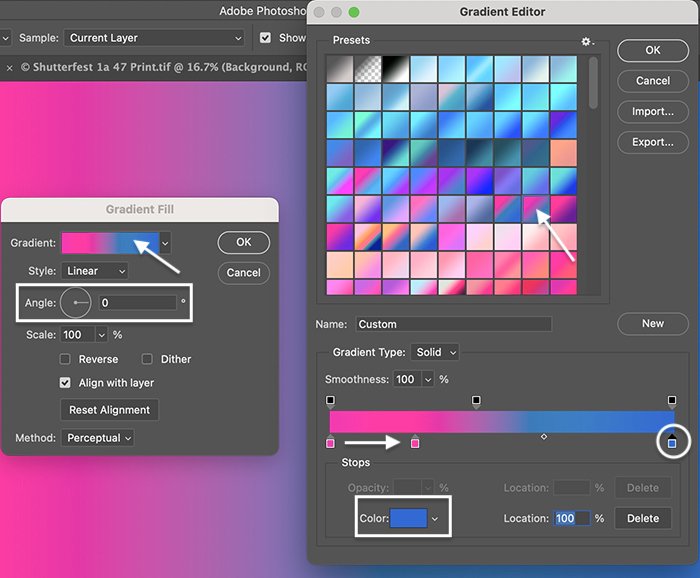
Step 2: Choose the Gradient Angle and Colors
In the Gradient Fill window, set the direction of the gradient by entering a number in the Angle box or adjusting the compass. To replicate this example, enter 0. The colors will be horizontal across the image. Feel free to angle your light on a diagonal. Click on the Gradient box to open the Gradient Editor. Choose a gradient. Photoshop comes with many different presets. For the example image, I applied Purple_18. But try a few different gradients and choose one that you like.
You can adjust the colors and blend using the color slider towards the bottom of the window. The square on the left shows the color on the far left of your image. The square on the right shows the color on the far right. Photoshop gradually merges the colors in the middle of the frame. To change the colors, select a square and then the Color box at the bottom of the window. Click on the slider to add more colors. Slide the squares towards the middle to keep the colors at full strength on the edges. To replicate the example image, change the pink to #cd408f and the blue to #094fc3. Also, slide the pink square to the right until the Location reads 25%. Click OK twice.
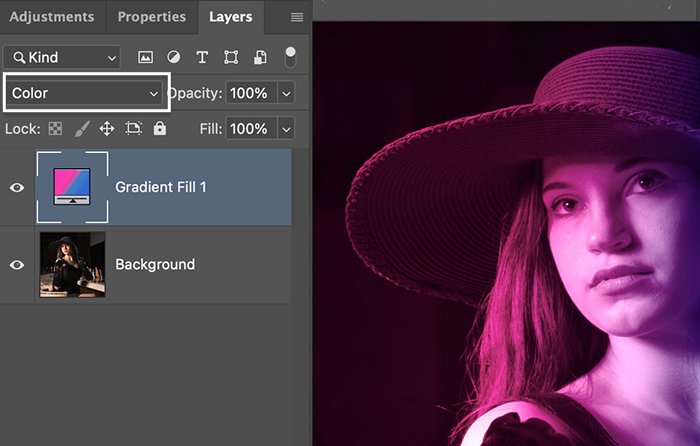
Step 3: Change the Blend Mode
With the Gradient Fill layer selected, change the blend mode to Color.
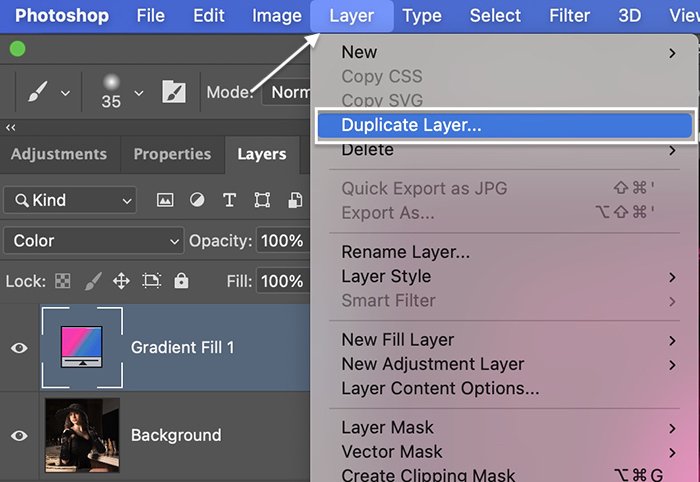
Step 4: Duplicate Gradient Fill Layer
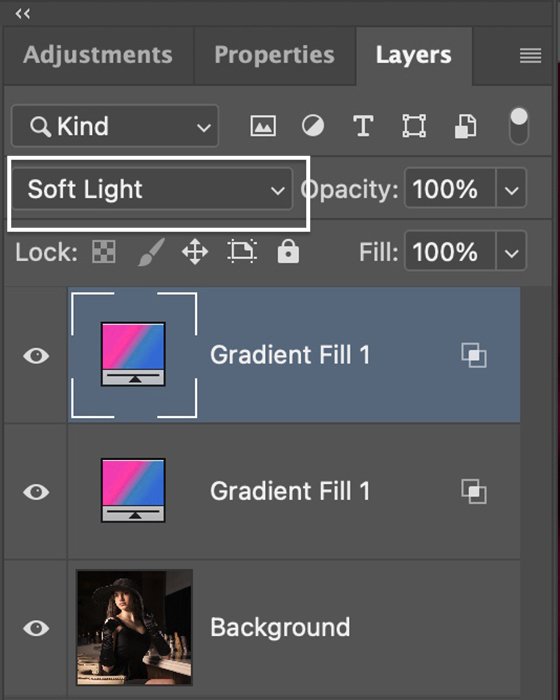
Step 5: Change Blend Mode of Duplicate Gradient Fill Layer
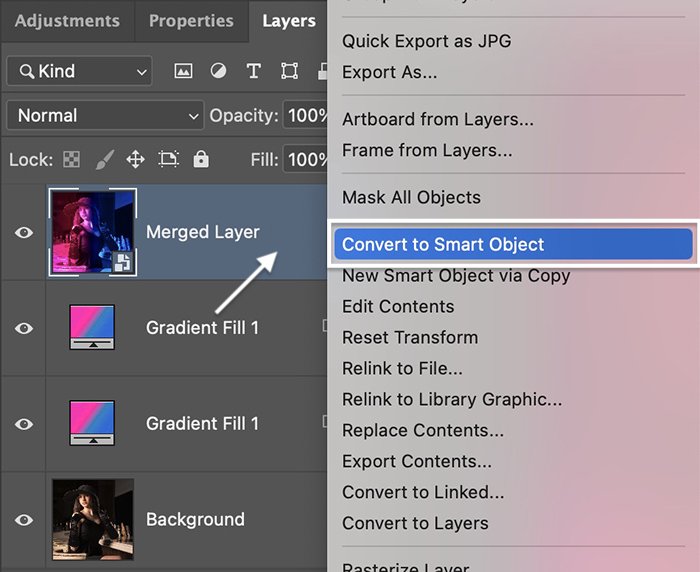
Step 6: Create a Merged Smart Layer
Select all layers and hold Shift+Alt or Option+Command+E. This creates a new merged layer at the top of the Layers panel. Rename the layer ‘Merged Layer’. Right-click on the new layer. Choose Convert to Smart Object.
Step 7: Add a Gaussian Blur and Change the Blend Mode
Select the Merged layer and add a slight Gaussian blur. Go to the Layer drop-down menu. Choose Filter > Blur > Gaussian Blur. Select a blur of around 20 pixels. Click OK. This time, change the blend mode to Linear Dodge (Add). This option gives an edgier look than blend modes like Soft Light or Overlay. Reduce the opacity to blend the neon glow effect into the image. A little goes a long way.
Conclusion
This tutorial has showed you how to add blur to an entire image for a dreamy effect and how you can create glow only in the highlights. Gaussian blur is a powerful way to add a Photoshop glow effect… and by using fill layers, you can add a subtle color or go all out and add a powerful neon glow. And best of all, these looks are fully customizable. So, you can create exactly the kind of glow effect in Photoshop that you want! Try out our Dreamy Childhood Portraits e-book to create your own unique, artistic, and timeless photos!